Each of the 5,555 Totems are completely unique and have 5 different traits that help to define them. Totems are map assets, which are manufactured by Upland, and must be placed on a property that you own. They can be bought and sold in map asset showroom metaventures. Each of the 5 visual traits are mapped to an attribute that factors into its ability to generate PROTEM. In the graphic below you can see the 5 different traits as well as the rarities of each type. The goal of owning a totem is to maximize the amount of PROTEM it produces. Below the graphic is a more detailed explanation of each trait and how it factors into PROTEM generation.
Totem Traits by Upland Guide
Below are the different totem traits explained (visual trait | mapped attribute)
Each totem is a map asset, and has its own size - Micro, Small, Normal, Medium, Large, Extra Large, Huge, Gigantic, and Epic, ranging from least to most rare. The size of the totem represents the amount of PROTEM that it can hold before you must collect it. The larger the totem, the fewer times you will need to login to Upland in order to collect the PROTEM earnings over a fixed period of time.
Totems must be fed with PROTEM on a regular basis. By feeding it you are able to earn additional PROTEM. There are 4 variations: Hexagon, Pentagon, Square, and Circle, ranked from least rare to most. What happens if you are late to feed it, or forget to do it all together? The larger the stamina of your totem, the more flexibility you have in your feeding schedule, and the more you will be able to delay these penalties for missed feedings.
Below are the 4 different penalty variations:
Variation 1: For each spend opportunity you miss, future intervals suffer a yield reduction. The penalty increases cumulatively, meaning if you miss more intervals, the reduction in yield becomes more significant. Reaching a 100% penalty is possible, which effectively renders your totem inactive for the remaining cycle.
Variation 2: Every time you miss a spend opportunity, the life cycle of your totem shortens by one interval. This means that the totem will stop producing rewards sooner than it would have if all spend opportunities were utilized.
Variation 3: You can miss up to five spend intervals without any penalty. However, upon missing the sixth, your totem stops yielding rewards immediately, ending the cycle prematurely.
Variation 4: There are no penalties for missed spend intervals.
There are 7 color variations for totems: Orange, Brown, Purple, Green, Red, Blue, and Gold—ranging from least to most rare. Each color represents the optimum time intervals between feeding sessions of your totem. Nurturing your totem happens over a 30 day cycle, and the number of times your totem should be fed within that 30 day cycle would be 30 [days] / frequency [days]. The frequency can vary up to 50 hours. For example if your frequency is 24 hours, then you should feed your totem on the 12th hour of that time window, or a total of 60 times over the full cycle to optimize your PROTEM yields.
Moreover, you should feed your totem in the middle of the interval period (the 6th hour) for maximum rewards.
Each totem has a unique optimal spending interval, decipherable through hints given when feeding your Totem. Spending within this window yields maximum returns. Spending outside this timeframe, either early or late, reduces the yield for that period.
The style of the totem has 7 variations—from least to most rare: Elegant, Gamer, Ancient, Fantasy, Future, Painted, and Fluid. Each style represents the total amount of PROTEM that can be used to generate PROTEM yield (or output, detailed below).
This means that a rarer style of totem can be fed more PROTEM, thus potentially yielding more PROTEM than a totem that cannot be fed as much.
There are also penalties on how you spend your protem.
Overspending: If you spend more than the optimal amount in a given interval, the excess amount doesn't contribute to increased yields. Essentially, this excess spend is wasted.
Underspending: If you spend less than the optimal amount, the yield you receive for that interval is reduced. The penalty is calculated using a formula that proportionally decreases the yield based on how much less you spend compared to the optimal amount.
Multiple spends in an interval: only the highest amount will be taken into account, as well as its timing, within the interval. All other spend is lost.
There are 11 different visual life forms of Totems. Each different form has a different yield curve.
The following are the 6 different archetypes of outputs. Aside from the Static Llama, each archetype has 2 different curves, equaling 11 different curves representing the 11 different life forms.
- Linear: Here, your rewards grow consistently over time – it's a direct, predictable climb, much like walking up a gentle slope.
- Hockey Stick: This curve plays the long game. Initially, it's all slow and steady, but wait for it... suddenly, your rewards skyrocket, mirroring the sharp turn of a hockey stick. It's a game of patience with a potentially big payoff.
- Wave: Get ready to surf! Rewards on this curve rise and fall, creating a wave-like pattern. It adds an element of timing and rhythm to your strategy, as you aim to catch the high points for maximum rewards.
- Sharp Step: This curve initially offers rewards at a steady pace, then unexpectedly “steps” up to a higher rate. The sudden sharp step adds a dynamic twist to the earning trajectory.
- Mild Step: In this curve, rewards begin at a consistent rate, then take a more mild step up at some point. The increase is slight, offering a modest yet noticeable lift in earnings.
- Static Llama: Exclusive to the rare, one-of-a-kind Llama Totem, this output features a stable and consistent earning pattern.
The following graph is out of date and not representative of the archetypes above, but it can give an insight as to how some of the archetypes might look.
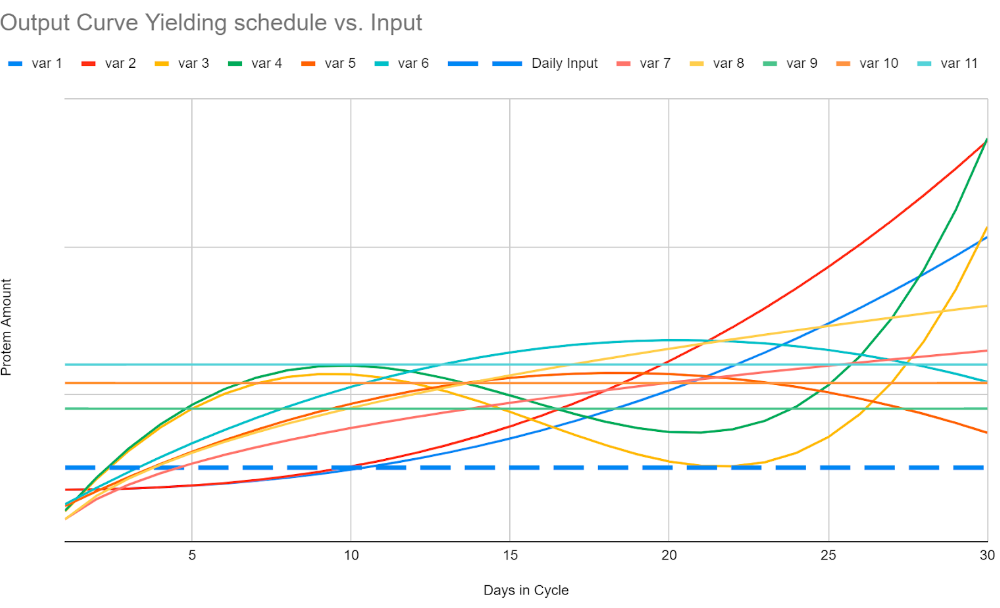
Some curves excel at yielding Protem rewards immediately, while others unleash their true potential at later stages. Additionally, certain curves may display more volatility than others, adding an exciting element to the game.
The dotted blue line indicated the PROTEM input and the representing curve shows the optimum yielded output. You can see that when fed correctly, every totem will provide you with more PROTEM then was used to feed the totem over the 30 day cycle. Looking at the curve alone isn't enough. The other traits can and will affect the ability of you to properly adhere to the optimum feeding times. For example, if you have a large input, but a small capacity, you will have to login more frequently to collect your PROTEM before it reaches maximum capacity.